Below you will find what the program Jellyfish V.3.00 (level 7, using the
bear off database) regards as the top 4 plays of each position and the analysis of "The Backgammon Handbook"
author and accomplished Backgammon player Martin Fischer, translated and edited by yours truly. All the positions
have been rolled out with Snowie pro 12,000 times and the equity differences between the top 2 moves are in generally
larger than the first quiz. This in English means that the answers are correct within all reasonable certainty
:-) The positions in Jellyfish format can be downloaded from my download page, should you wish to roll them out yourself.
If you have forgotten what your original answer was, then simply use
your browsers back button to have a quick look.
![]() or scroll down for the first position
or scroll down for the first position
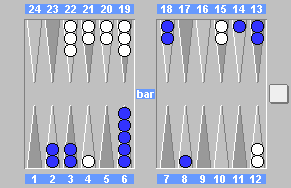
1) 5 point match, Blue trails 0:2, Pip count: Blue 124 / White 112.
Blue to play 5-2?
|
Move |
Rkg. |
Equity |
Eq. Dif. |
| (a) 8/3 6/4* |
2. |
-0.491 |
0.122 |
| (b) 14/9 6/4* |
1. |
-0.369 |
0.000 |
| (c) 14/9 8/6 |
3. |
-0.495 |
0.126 |
| (d) 13/8 13/11 |
4. |
-0.506 |
0.137 |
Blue is in trouble. Behind in the race, weaker home board and is forced to leave a shot with this roll. Blue has
to fight for a foothold in this game and that means attacking whites blot on the 4 point with 6/4*. The 5 should
be brought down from the 14 point as it provides the most covering numbers next roll. Blue is behind anyway so
leaving the 2 outfield blots is not as risky as it might appear. All other moves are too passive and give white
the chance to show a nasty cube. ![]()
![]()
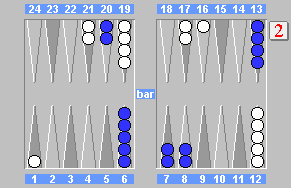
2) 5 point match, Blue leads 2:0, Pipcount: Blue 152 / White 146.
Blue to play 1-1?
|
Move |
Rkg. |
Equity |
Eq. Dif. |
| (a) 8/7 6/5(3) |
2. |
0.153 |
0.057 |
| (b) 8/7(2) 6/5(2) |
4. |
0.146 |
0.064 |
| (c) 6/4 6/4 |
1. |
0.210 |
0.000 |
| (d) 8/5 6/5 |
3. |
0.151 |
0.059 |
The advantage of 6/4 6/4 is that it makes a second home board point without leaving an indirect shot. In addition
the prime is improved from a 3.5 point prime to a broken 5 prime. Also of note, is that white has to do something
with the blot on the 16 point before plans of using a whole roll to run, this gives Blue time to bring builders
down from his midpoint to make the 5 point without great risk. Sometimes you have to break the general rule of
building home board points without breaks.
![]()
![]()
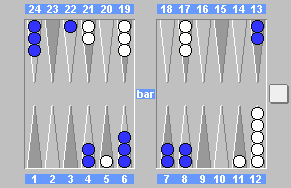
3) 5 point match, Blue trails 3:2, Pipcount: Blue 176 / White 149.
Blue to play 6-3?
|
Move |
Rkg. | Equity | Eq. Dif. |
| (a) 24/18 8/5* |
1. |
-0.235 |
0.000 |
| (b) 24/15 |
3. |
-0.328 |
0.093 |
| (c) 22/16 8/5* |
2. |
-0.322 |
0.087 |
| (d) 22/13 |
4. |
-0.343 |
0.108 |
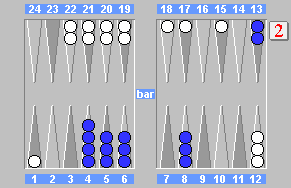
4) 5 point match, Match is even 0:0, Pipcount: Blue 99 / White 124.
Blue to play 5-3?
|
Move |
Rkg. | Equity | Eq. Dif. |
| (a) 13/8 13/10 |
3. |
0.662 |
0.171 |
| (b) 13/8 4/1* |
4. |
0.366 |
0.467 |
| (c) 6/1* 4/1 |
1. |
0.833 |
0.000 |
| (d) 8/3 6/3 |
2. |
0.666 |
0.167 |
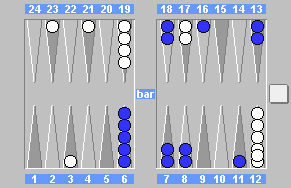
5) 5 point match, Match is even 0:0, Pipcount: Blue 149 / White 146.
Blue to play 5-3?
|
Move |
Rkg. | Equity | Eq. Dif. |
| (a) 8/3* 6/3 |
1. |
0.311 |
0.000 |
| (b) 16/11 13/10 |
3. |
0.202 |
0.109 |
| (c) 16/8 |
4. |
0.193 |
0.118 |
| (d) 16/11 6/3* |
2. |
0.234 |
0.077 |
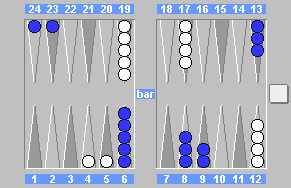
6) 3 point match, Match is even 0:0, Pipcount: Blue 158 / White 155.
Blue to play 2-1?
|
Move |
Rkg. | Equity | Eq. Dif. |
| (a) 24/22 23/22 |
2. |
0.028 |
0.122 |
| (b) 6/4* 6/5* |
1. |
0.150 |
0.000 |
| (c) 23/21 6/5* |
3. |
0.027 |
0.123 |
| (d) 6/5* 5/3 |
4. |
0.017 |
0.133 |
The faint hearted won't like the 6/4* 6/5* move. It leaves a whopping 25 roll combinations which hit. The 5 and
4 points are valuable and should be fought for early in the game. 23/21 6/5* leaves 20 combinations which hit,
only 5 less than the double hit. White is forced to roll well next turn with the double hit and should white fail
to hit then Blue could take a decisive advantage next roll. 24/22 23/22 is a blunder. Way too passive and doesn't
come close. ![]()
![]()
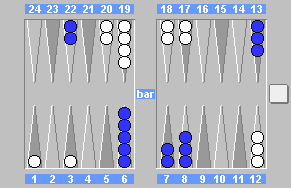
7) 5 point match, Blue is trailing 1:3, Pipcount: Blue 151 / White 149.
Blue to play 2-2 ?
|
Move |
Rkg. | Equity | Eq. Dif. |
| (a) 8/4 6/4(2) |
2. |
-0.047 |
0.100 |
| (b) 13/11 8/4 6/4 |
3. |
-0.062 |
0.115 |
| (c) 7/5(2) 6/4(2) |
1. |
+0.053 |
0.000 |
| (d) 13/11 6/4(3) |
4. |
-0.086 |
0.139 |
The key to understanding this position is to realise that Blue does not have to play the prime vs prime game but
can also make attacking moves or moves that prepare for an attack.Unstacking the heavy 6 point and making the important
5 point puts pressure on White to perform. Note: Bringing 2 checkers down from the midpoint to the 9 point is likely
to result in a prime vs prime battle in which White will have the better timing (unlikely to be forced to break
the prime first.)
![]()
![]()
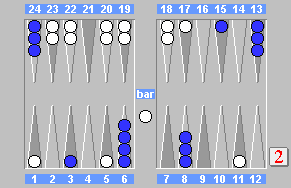
8) 5 point match, Match is even 0:0, Pipcount: Blue 157 /
White 140.
Blue to play 6-4?
|
Move |
Rkg. | Equity | Eq. Dif. |
| (a) 15/11* 11/5* |
1. |
-0.583 |
0.000 |
| (b) 13/7 15/11* |
3. |
-0.716 |
0.133 |
| (c) 15/9 13/9 |
4. |
-0.760 |
0.177 |
| (d) 13/3 |
2. |
-0.667 |
0.084 |
Bad day in the office for Blue :-) Horrible position to be in. Blue needs time to get some form of structure going,
either defensive or offensive. Hitting on the 11 point (15/11*) strips White of a potential builder for the important
21 point and catches up in the race a bit (only 17 behind). Blue must now consider the 6. With 3 men back Blue
HAS to use his/her checkers efficiently to form a prime, that means slotting the valuable 5 point and hitting at
the same time (11/5*). White has 3 checkers on the bar. Blues blots, if hit, may help towards either the making
of the 21 point or a possible 1-4 backgame position. Any other move is just too weak and puts little pressure on
white to roll well.![]()
![]()
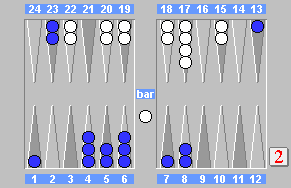
9) 5 point match, Match is even 0:0, Pipcount: Blue 123 / White 119.
Blue to play 4-1?
|
Move |
Rkg. | Equity | Eq. Dif. |
| (a) 6/1 |
2. |
-0.395 |
0.116 |
| (b) 13/9 8/7 |
3. |
-0.439 |
0.160 |
| (c) 7/3 4/3 |
1. |
-0.279 |
0.000 |
| (d) 8/4 8/7 |
4. |
-0.479 |
0.200 |
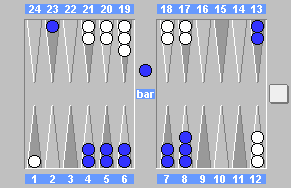
10) 5 point match, Match is even 0:0, Pipcount: Blue 142 / White 129.
Blue to play 2-1 from the bar?
|
Move |
Rkg. | Equity | Eq. Dif. |
| (a) 25/24 8/6 |
3. |
-0.233 |
0.105 |
| (b) 25/23 8/7 |
2. |
0.231 |
0.103 |
| (c) 25/22 |
1. |
-0.128 |
0.000 |
| (d) 25/24 13/11 |
4. |
-0.322 |
0.194 |
Disclaimer: The
answers to these positions are based on three separate evaluations. Jellyfish's standard evaluation at level 7,
extensive roll outs and the study of the positions from a top drawer player. It is unlikely that any of these answers
are wrong but cannot be ruled out as until someone or a program masters the game of backgammon then all positions
in theory are debatable. If you are adamant that a position wrong then let me know and I'll check it out. You might
also want to open it up for discussion, this can easily be done by using my Guestbook as a sounding board or perhaps
download the position(s)
and roll them out for yourself (Jellyfish Analyser required).
Should thee fail to sign my Guestbook, then thee shall be
cursed by rolling 5-1 forever more...
BG Home ~ Links ~ Quiz ~ Download ~ Webby's Homepage ~ Credits ~ E-Mail